Doegui
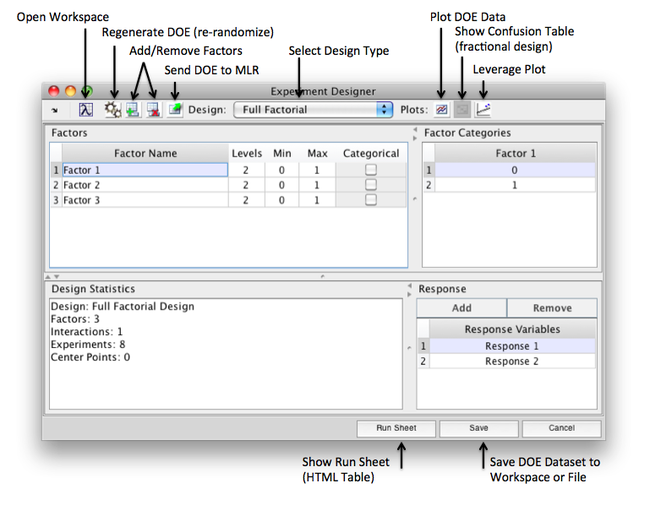
Experiment Designer Window
The Experiment Designer can be launched from the Workspace Browser under the Tools section, or with PLS_Toolbox from the command line using the command: doegui.
On initialization, a default design appears with a single factor and single response variable. Use the toolbar buttons and the tables to create and modify your design. For more information about design types see the discussion in the Menu Bar section below.
When the design is complete, the buttons at the bottom of the window can be used to save the DOE to the workspace or disk or print a design run-sheet, and the toolbar buttons can be used to send the design to the Analysis window. Within Analysis, a corresponding Y-Block (response DataSet) can be automatically created and the DOE response results analyzed using ANOVA or regression analysis.
Factor and Category Tables
Use the Factors table to name and adjust each factor of your design. Add or remove factors using the toolbar buttons. Once a factor is added to the table you can click in each field of the table to adjust a particular value. If you adjust the Levels, Min, or Max the Factor Categories table will immediately update. The Categorical column indicates whether each factor is numerical or categorical.
When a factor is numerical, the category values can be either automatically generated as linearly spaced values using the min and max settings, or manually selected (for example, to set non-linear spacing when using 3 or more levels) by editing the factor category table directly.
When a factor is categorical, default alphabetical values are added to the category table and can be edited directly assigning names which are specific to the factor being defined.
Toolbar
Toolbar buttons include the following actions:
- Open Workspace - Open or bring forward the workspace browser.
- Recalculate - Regenerate and or re-randomize the DOE.
- Add Factor - Add a factor to the Factor Table.
- Remove Factor - Remove currently selected factor from Factor Table.
- Send to MLR - Send current DOE dataset to the Analysis window preset to MLR analysis mode.
- Design - Drop-down menu for selecting a design (see design types below).
- Plot DOE Data - Open raw DOE DataSet in a Plot Controls window.
- Show Confusion - Open a confusion matrix table (if using a fraction design).
- Leverage Plot - Open a leverage plot.
Menu Bar
Adjust the Design and Interactions (One, Two, or Three term) from the window menu bar.
Supported design types include:
- Full Factorial (2 or more levels)
- - Easy to use, easy to understand experimental designs
- - Fractionation of Full design often used to save resources/time while still provide info on the significance of main factors and interactions.
- Fractional Factorial (2 Level)
- - Resource saving subsets of Full 2-level factorials
- - 1/2, 1/4, 1/8 or 1/16 Fractional Factorial designs Available
- - Some designs only possible with more factors in table
- Spherical CCD (5 Level)
- - Based on 2-level factorial designs with additional points for modeling curvature. Amenable to sequential experimentation. Very efficient design.
- Face-Centered CCD (3 Level)
- - Modification of Spherical CCD. Useful when region of interest is cubodial.
- Box-Behnken (3 Level)
- - Useful when the design space to be investigated is physically constrained and corner point are not realistically accessible (ex. for safety reasons, both factors A and B cannot simultaneously be set to HI).
Design Statistics
This panel shows the current statistics for the DOE including:
- Design Type
- Number of Factors
- Interactions
- Total Number of Experiments
- Number of Center Points
If an error occurs while creating the DOE information about the error is displayed here. Information is automatically updated as you adjust the factor table, so an error may display until you add additional factors, for example.
Response Table
Use the Response table to add, remove, and name response variables. These variables are included as columns in the run sheet. They are also used when automatically creating a Y-Block Response DataSet when analyzing the DOE in the Analysis Window.
Run Sheet
Clicking the Run Sheet button will open the DOE as an HTML table in a new window. From this window the run sheet can be reviewed, saved to file and subsequently printed.
